
Felt Wreath for Fall
I must admit, I haven't been into Fall decorating this year. I am already finding myself thinking about Christmas and longing for the twinkle of Christmas lights around our home. This is totally unlike me. I am usually all about each or the seasons because each is an opportunity to decorate my home, but this Fall has been crazy...I just made chili for the first time last week! Usually chili and my famous Jalapeno Cheddar Cornbread...I'll share soon...are every-Sunday rituals. But, so far, this Fall has gotten away from me, and the 70 degree weather hasn't helped much either. I haven't even worn a real sweater yet this year!
I hate for Fall to get gypped, so I got around to putting out a few pumpkin candles and a fall-ish tablescape and this wreath! I gathered inspiration for Pinterest, where else? Here are some of my inspiration wreaths 1 , 2, 3 Once I got inspiried, I picked up all of the materials and got busy crafting this pretty Fall Felt Wreath. At least our front door is feeling in the love this season.
 Isn't she lovely? I think so :) Here's what you need and how to make a Felt Flower Wreath for yourself!
What you need:
Wreath form (I used a large straw one)
Spool of yarn (whatever color your heart desires)
Multiple colors of felt (I used 9 - 8 1/2 x 11 sheets for mine)
Cardboard
Hot glue gun and plenty of sticks
Ribbon to hang it
Now let's get started! The first and most tedious and annoying step (which I also forgot to photograph - woops!) is to wrap your wreath. This took a.long.time. I would recommend doing this while you watch a TV show...or seven.
Next cut your felt. You need to make squiggly lines out of the square fabric. I used two different methods...photos of each are below. Length of the strip will determine how large your flower is, so experiment a little. I used various sizes and liked that look. You also want to leave a round..or oval if that's how it works out, piece at the bottom for stability.

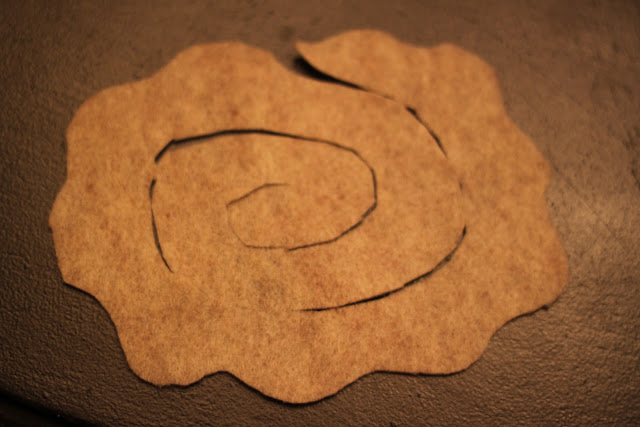

Next you need to take each length of felt "ribbon" and roll it into a tight rosette. I didn't think this would work as well as it did, but the felt really weaves its way into a pretty flower...with just a little coaxing.


Use your hot glue to secure the bottom. You will also secure a round piece of cardboard, which will help when you attach to the wreath.

Before you start gluing them to the wreath, lay it on the table and play around with the placement until you have a good idea of what looks right. Once you have it all worked out and all of your felt flowers are glued in to place, attach and ribbon and hang on your door!

I hate for Fall to get gypped, so I got around to putting out a few pumpkin candles and a fall-ish tablescape and this wreath! I gathered inspiration for Pinterest, where else? Here are some of my inspiration wreaths 1 , 2, 3 Once I got inspiried, I picked up all of the materials and got busy crafting this pretty Fall Felt Wreath. At least our front door is feeling in the love this season.

What you need:
Wreath form (I used a large straw one)
Spool of yarn (whatever color your heart desires)
Multiple colors of felt (I used 9 - 8 1/2 x 11 sheets for mine)
Cardboard
Hot glue gun and plenty of sticks
Ribbon to hang it
Now let's get started! The first and most tedious and annoying step (which I also forgot to photograph - woops!) is to wrap your wreath. This took a.long.time. I would recommend doing this while you watch a TV show...or seven.
Next cut your felt. You need to make squiggly lines out of the square fabric. I used two different methods...photos of each are below. Length of the strip will determine how large your flower is, so experiment a little. I used various sizes and liked that look. You also want to leave a round..or oval if that's how it works out, piece at the bottom for stability.


Next you need to take each length of felt "ribbon" and roll it into a tight rosette. I didn't think this would work as well as it did, but the felt really weaves its way into a pretty flower...with just a little coaxing.


Use your hot glue to secure the bottom. You will also secure a round piece of cardboard, which will help when you attach to the wreath.

Before you start gluing them to the wreath, lay it on the table and play around with the placement until you have a good idea of what looks right. Once you have it all worked out and all of your felt flowers are glued in to place, attach and ribbon and hang on your door!

And voila, you're done!
I'm linking up with I Love You More Than Carrots "Hey, That's Pin-tastic" series...so head over there and check out the other links!

This is beautiful!
ReplyDeleteThanks for sharing such a great tutorial. I know there are tons out there but I'm glad I've come across yours. You've made it look easy.
I've been searching for a perfect throw pillow and am convinced I'll never find it...now I'm thinking I could buy a plain one and try your flower making tips to fancy it up!
Thanks for your comment Kristine! I'm sure your pillows will turn out beautifully :)
Delete